5 Surprising Steps to Revive Your Smart TV with a Soldered Battery!
Reviving Your Smart TV: A DIY Guide to Battery Replacement
- Introduction
- Required Materials
- DIY Steps to Replace the Battery
- Common Mistakes to Avoid
- FAQ
- Conclusion
Introduction
After an evening binge-watching your favorite shows, you notice that your Smart TV isn’t functioning as it should. The screen flickers, the remote is unresponsive, and the once-vibrant display now looks dull. If this scenario feels familiar, it might be time to consider a battery replacement. But before you rush to the store, let’s explore some straightforward DIY steps to bring your TV back to life. Read on to learn how you can tackle this task with confidence.
Required Materials
Before diving into the battery replacement process, gather the necessary materials. Here’s what you’ll need:
- New Battery: Ensure compatibility with your Smart TV model.
- Screwdriver Set: A Phillips and flathead screwdriver are typically needed.
- Soldering Kit: This includes solder, a soldering iron, and wire cutters.
- Multimeter: To test the new battery and connections.
- Safety Gear: Gloves and safety glasses for protection.
DIY Steps to Replace the Battery
Now that you have everything you need, follow these steps for a smooth battery replacement:
1. Power Off Your Smart TV
Ensure your TV is completely powered down. Unplug it from the wall socket and lay it on a soft surface to prevent scratches.
2. Remove the Back Panel
- Use a screwdriver to carefully remove the screws holding the back panel in place.
- Gently lift off the panel and set it aside, taking care not to damage any internal components.
3. Locate the Battery
Inside the TV, locate the battery compartment. It is usually near the power supply or motherboard. If you’re unsure, consult your TV’s manual for guidance.
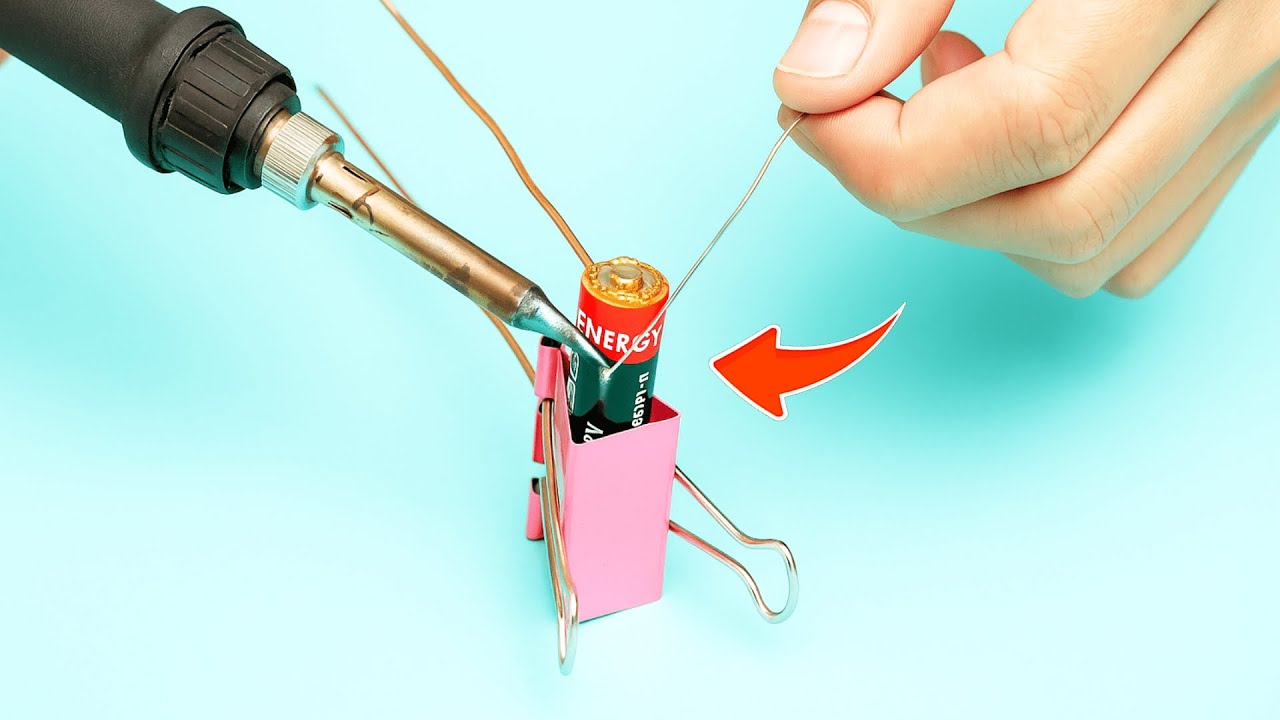
4. Desolder the Old Battery
- Heat the soldering iron and carefully desolder the old battery from the circuit board.
- Make sure to remember where each connection was attached for referencing when installing the new battery.
5. Install the New Battery
- Position the new battery in place, ensuring the polarity matches the old battery.
- Solder the connections carefully, making sure there are no cold solder joints.
Once soldered, use a multimeter to test the connections to ensure everything is working properly.
Common Mistakes to Avoid
When replacing your Smart TV battery, it’s easy to make a few common mistakes. Here’s what to watch out for:
- Forgetting to Power Off: Always disconnect your TV from the power source.
- Using the Wrong Battery: Make sure the new battery is compatible with your specific TV model.
- Improper Soldering: Avoid leaving cold solder joints; always ensure a secure connection.
- Ignoring Safety Gear: Protect your hands and eyes while using tools and soldering materials.
FAQ
How can I tell if my Smart TV battery needs replacing? If your TV frequently shuts off or the remote becomes unresponsive, it may indicate a battery issue.
Can I replace the battery myself? Yes, with the right tools and a bit of caution, replacing a battery is a manageable DIY task.
Is it safe to solder inside my Smart TV? Yes, if you follow safety guidelines and have experience soldering, it can be done safely.
Conclusion
Replacing the battery in your Smart TV can extend its life and improve performance. By following the outlined steps and avoiding common mistakes, you can successfully tackle this project yourself. What other DIY projects have you tried at home? Share your experiences in the comments!