5 Super Tips for a Game-Changing DIY Plastic Bottle Water Filter Hack!
Essential Tips for Crafting Your Own DIY Plastic Bottle Water Filter
- Introduction
- Required Materials
- How It Works
- Step-by-Step Guide
- Common Mistakes to Avoid
- FAQ
- Conclusion
Introduction
Imagine running out of clean drinking water while camping or during an unexpected emergency. You might find yourself in a situation where accessing fresh water feels impossible. Luckily, you can create your own DIY plastic bottle water filter with just a few simple materials. This method not only filters water but also showcases the power of creative recycling. Read on to discover how this process works and learn the steps to craft your own filter.
Required Materials
Before diving into the creation of your filter, gather the necessary supplies. Here’s a list of what you’ll need:
- 1 plastic bottle (preferably a 2-liter soda bottle)
- Sand
- Activated charcoal (you can find this at garden stores or pharmacies)
- Gravel or small stones
- Cotton balls or cheesecloth
- Scissors
- A clean container to catch the filtered water
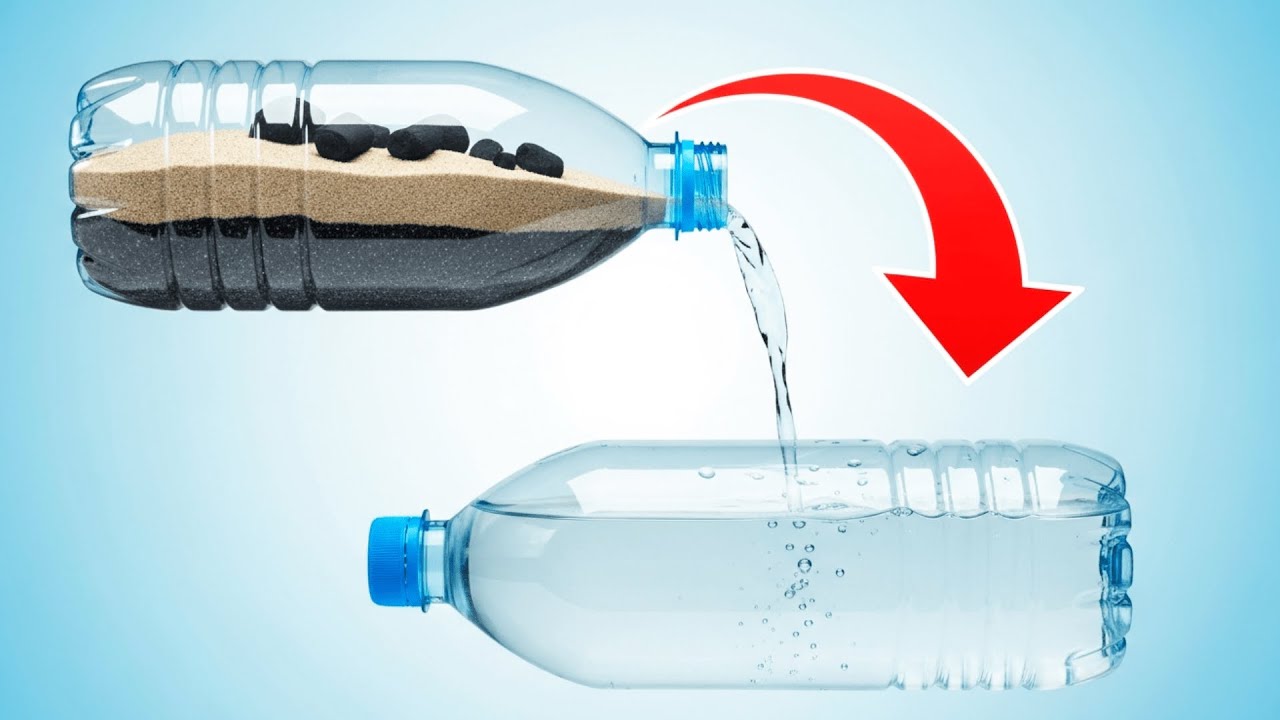
How It Works
Understanding the filtration process can enhance your confidence as you work on your DIY plastic bottle water filter. This filter uses various materials to remove impurities and contaminants from water.
Filtration Layers
The filter relies on multiple layers, each serving a specific purpose:
- Cotton balls or cheesecloth: The first layer captures larger debris and particles.
- Activated charcoal: This layer adsorbs chemicals, tastes, and odors.
- Sand: Sand helps to filter out remaining small particles.
- Gravel: Finally, gravel serves as a stabilizer to keep the sand in place.
Step-by-Step Guide
Follow this simple guide to create your own water filter:
Step 1: Prepare the Bottle
- Begin by cutting the bottom off your plastic bottle using scissors.
- Invert the bottle so that it sits upside down, with the neck pointing downwards.
Step 2: Layer the Materials
- Place cotton balls or cheesecloth at the neck of the bottle to act as the first filtration layer.
- Next, add a layer of activated charcoal on top, covering the cotton completely.
- Following the charcoal, pour in a layer of sand, making it about an inch thick.
- Finally, add a layer of gravel to keep everything compact and prevent clogging.
Step 3: Collect Water
Now your filter is ready! Pour unfiltered water into the open top of the bottle. Make sure to do this slowly to allow effective filtration. Collect the filtered water in your clean container.
Common Mistakes to Avoid
Creating your DIY plastic bottle water filter can be straightforward, but watch out for these common missteps:
- Skipping layers: Each layer plays a crucial role in filtration—don’t omit any!
- Using dirty materials: Ensure that all your supplies, especially sand and gravel, are clean to prevent adding impurities back into the water.
- Pouring too quickly: Allow water to filter through layers at a moderate pace for better results.
FAQ
What types of water can I filter with this method?
This DIY filter works best with water that is relatively clear. It can remove particulates but may not effectively eliminate all pathogens.
How long does the filtering process take?
The time can vary, but generally, filtering one liter of water might take anywhere from 10 to 30 minutes, depending on how fine the materials are packed.
Can I reuse the materials?
While you can reuse the bottle and may be able to clean the gravel, sand, and charcoal, it’s usually best to replace these materials after several uses to maintain filter effectiveness.
Conclusion
Crafting your own DIY plastic bottle water filter is an accessible and practical skill that can provide you with clean water when needed. By following the steps outlined above, you’ll have a functional filter in no time. What experiences have you had with DIY projects like this? Feel free to share your thoughts in the comments below!