5 Steps to Successfully Repot Your Orchid and Prevent Root Rot
5 Steps to Successfully Repot Your Orchid and Prevent Root Rot
- Introduction
- Steps for Repotting Your Orchid
- Essential Materials for Repotting
- Common Mistakes to Avoid
- FAQ
Introduction
Caring for your orchid can often feel like a delicate balancing act. You may find that despite your best efforts, your beautiful plant struggles, often due to root rot or overcrowded roots. Repotting your orchid isn’t just about changing the pot; it’s an essential aspect of maintaining its health and vibrancy. Understanding when and how to repot can be a game-changer in your orchid gardening journey. Read on to learn the effective steps for a successful repotting process.
Steps for Repotting Your Orchid
Repotting your orchid can seem daunting but breaking it down into manageable steps makes it more approachable. Follow these steps to ensure a successful transition for your plant.
1. Prepare Your Workspace
- Gather all necessary materials like fresh potting mix, a clean pot with holes, and scissors.
- Clear a flat surface to work on; it’s essential to keep everything organized.
- Wear gloves if you’re sensitive to certain plant components.
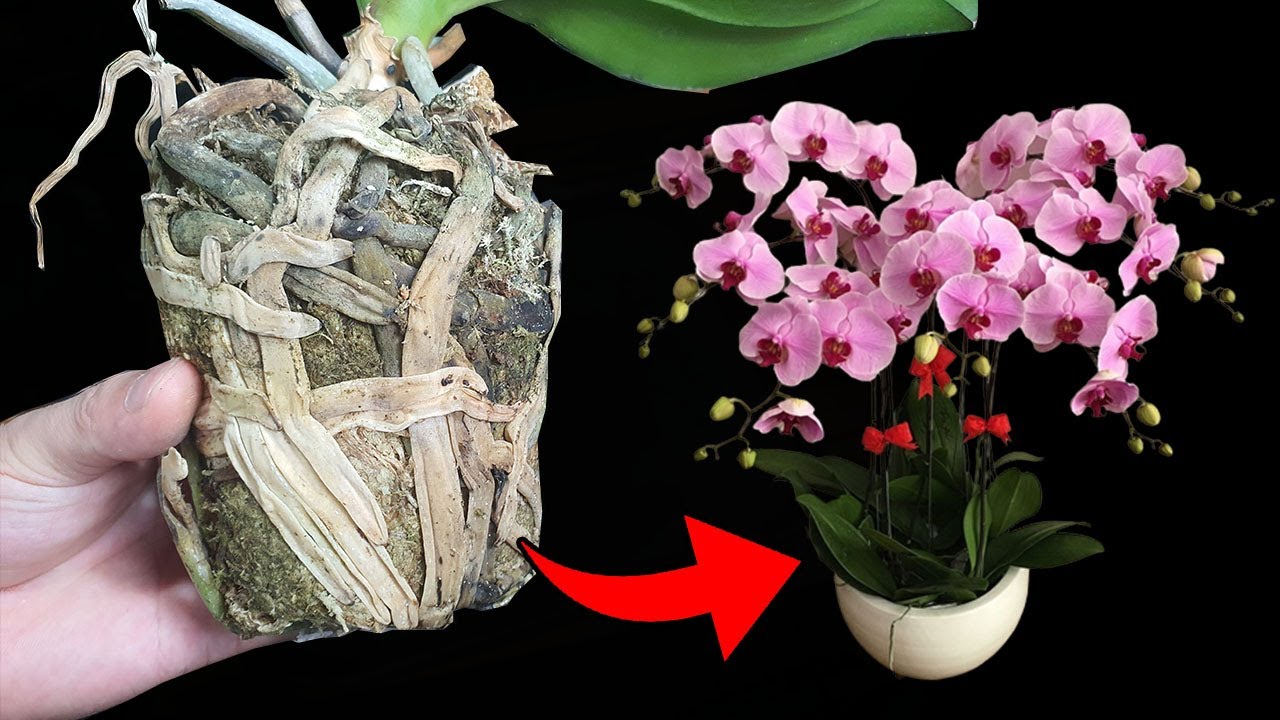
2. Remove Your Orchid from its Pot
Carefully taking your orchid out is vital for examining the roots.
- Gently pull the plant out of the pot, squeezing the sides if necessary.
- Inspect the roots for any signs of rot or damage.
- Trim away any black or mushy roots with sanitized scissors.
3. Clean the Roots
Cleaning the roots prepares them for the new potting mix.
- Rinse the roots under lukewarm water to remove old potting media.
- Examine the roots for healthy green areas, which indicate a thriving plant.
- Dry the roots gently before repotting.
4. Add Fresh Potting Mix
Choosing the right potting mix is crucial for your orchid’s long-term health.
- Choose a mix specifically designed for orchids, often containing bark and perlite.
- Add a layer of mix to the bottom of the new pot.
- Place the orchid in the center and fill around the roots, ensuring no air pockets remain.
5. Aftercare Following Repotting
Once repotted, your orchid requires special attention to adapt to its new environment.
- Water lightly after repotting, ensuring not to saturate the roots.
- Place the orchid in a spot with indirect sunlight for a few weeks.
- Monitor for signs of stress or rot in the following weeks.
Essential Materials for Repotting
Having the right materials on hand can make a world of difference in the repotting process. Here’s what you’ll need:
- Fresh orchid potting mix
- A clean pot with drainage holes
- Sanitized scissors or pruning shears
- Water and spray bottle for humidity
- Gloves (optional)
Common Mistakes to Avoid
To ensure your orchid thrives post-repotting, be mindful of these common pitfalls:
- Using the wrong potting mix can lead to poor drainage and root rot.
- Overwatering after repotting can suffocate the roots.
- Repotting too frequently may stress the plant and interfere with its growth cycle.
- Ignoring the signs of root rot can lead to further damage.
- Using unsanitized tools risks introducing diseases.
FAQ
When should I repot my orchid? Typically, you should repot your orchid every one to two years or when you notice signs of overcrowding or root rot.
How do I know if my orchid has root rot? Signs include black or mushy roots, a foul smell, and wilting leaves despite regular watering.
Can I use regular potting soil for my orchid? No, orchids require a specially formulated potting mix that allows proper airflow and drainage.
Conclusion
Properly repotting your orchid is essential for its health and longevity. By following these steps and avoiding common mistakes, you can enjoy beautiful blooms for years to come. Have you repotted your orchids before, and what tips do you have for others? Feel free to share your experience in the comments!